Rich Landau, photographed by Jamie Leary.

Behind the Line is Foobooz’s interview series with the people who make up Philadelphia’s dynamic bar and restaurant scene. Click here for the full archive.

When you’re talking about vegan restaurants in Philadelphia, the conversation must revolve around Rich Landau, who, along with his wife Kate Jacoby, now own Vedge, V Street, and Wiz Kid, which just debuted in Rittenhouse. Landau has been operating vegan restaurants in Philadelphia since well before you realized it was cool to eat vegan, and here, he tells us all about it.

My full name is… Richard Stephen Landau. Landau is German. As we tried to trace our family roots, it looks like our name was changed when my great-grandparents got on the boat. It’s still a question mark.

I grew up in… Elkins Park. These days, I live in between South and Lombard. Kind of Graduate Hospital. Some would say South Rittenhouse. It’s really nice. Like the Wonder Years.

My favorite kitchen tool is… a very clean pair of hands. I believe in a sharp knife and good whisk and freshly ground pepper, but a great chef uses a really good, clean pair of hands. This whole plastic glove thing is just so sad. All this plastic touching your food all the time. And someone coughs into their plastic glove, it’s not so sanitary now, is it?

I met Kate… when she came in to apply for a job at my restaurant Horizons in Willow Grove in the summer of 2001. She walked through the door and we hit it off instantly. That September, she left to go to France to teach English, and we were lovesick, so she came home and we’ve been working together every day since.

My first restaurant job was… working as a bartender at the Adam’s Mark Hotel on City Avenue. And then I went to work for Derek Davis at Sonoma in Manayunk. I opened Horizons right after that in 1994.

I ate my last piece of meat… so long ago, I don’t even remember.

I became a vegan… for ethical reasons. I still crave meat every day. It’s all I wanna do. I’m not one of those people who give it up and then become appalled by the idea, who walk past a backyard barbecue and get sick. I’m a carnivore at heart, and this is a really big sacrifice. But it’s the right thing to do.

People who think they’re going to hate vegan food love it when I make… seared maitake mushrooms, eggplant braciole or grilled tofu with a ssamjang glaze. I cook vegetables like any other chef would cook meat, and then people realize: it wasn’t the meat that tasted so good, it was what the chef did to it. Food is about flavor, not flesh.

One really easy vegan recipe you should try at home is… vegan ramen, which my wife and I eat for breakfast almost every day. That’s a really easy vegan recipe. You just need a basic vegan dashi stock with kombu seaweed, shiitake mushrooms and soy sauce, and then you throw whatever else you have in there… radish, bits of green vegetables, whatever. And some fresh ramen noodles. And we like it with lots of chili sauce.

For our last vacation, we went to… London. We just got back this week. It was great. I love London. Our last trip before that was to Vietnam, and I was walking around in 110 degree heat like I was the vegan Anthony Bourdain. This was much more relaxing.

Rich Landau and Kate Jacoby in Vietnam in April 2017.

Dinner for two at my restaurants will set you back about… $100 at Vedge, $60 at V Street, and $25 to $30 at Wiz Kid.

My favorite dish at a non-vegan restaurant in Philadelphia is… the boiled hot sauce tofu at Jane G’s. It’s so good, it’s ridiculous. When Jane G’s is on, it kind of kills Han Dynasty and Dan Dan, but I like all of them.

The most famous person I ever cooked for was… Katy Perry, when she was here for the DNC. I was at my nephew’s bar mitzvah and M. Night Shyamalan, who is a good friend, kept calling me. I finally pick up and he says, I wanna bring in Katy Perry and Cory Booker and Orlando Bloom tonight. We cooked them the whole menu, family style. There were 12 of them, and the check came to $1,738.

Ten years from now, I might… have a Wiz Kid in every single airport in America. Or just what we have now. I kind of hate to force the future. There are too many mistakes out there waiting to happen, so we take it slow and make sure it feels right. And if the whole Philly restaurant thing doesn’t work out, I’ll have a nice barn house in the countryside with one big table and serve one big dinner party every night with vegetables from my garden, and I’ll shuttle guests there from the city so they can drink and not worry about it.

The hardest thing about this business is… the constant stress and worry. People I know who didn’t own restaurants and now do always ask me, My god, why didn’t you tell me? I went back to Derek Davis and told him, I’m sorry if I was ever difficult. I thought you were a raving lunatic, but now I realize you were just a restaurant owner under pressure.

If you want to work for me, you have to be… really good about personal hygiene. And like Marc Vetri told you, you have to have a sense of urgency, which seems to be a dying art these days.

Recipes are… something I have never followed in my life.

One junk food I love is… French fries. At the end of the day, it’s all about French fries. I love them all over the city and if I’m on the road, I’m not above stopping by Burger King. There’s beef tallow in McDonald’s fries*. But Burger King and Wendy’s are both vegan.

Yelp is… out of control. There’s no regulation. Everyone knows that people who have a grudge against you personally and competitors leave bad reviews. Everyone knows it happens. And I once had someone leave us a nasty review just because we were closed when they wanted to eat at Vedge. That’s just not fair.

Philly’s restaurant scene is… reaching its breaking point. Pretty soon, there won’t be enough staff. It’s happening now. I think a lot of the whole Top Chef mania and the celebrity chef thing brought all these young kids out from white collar families into a business that was traditionally a blue collar job. The spotlight’s on us! We’re gonna end up on Iron Chef! People will fall at our feet! That’s just not the case. Now they’re cut, burnt, and they have tattoos they can’t remember getting. People are crashing and burning.

When I want a cup of coffee, I go to… my Krups coffee machine. I never go out for coffee. I hit a button, it grinds the beans, and out comes this really beautiful frothy coffee with a nice crema on it.

When I want pizza, I go to… Nomad. Their marinara pie is truly one of the best foods I have ever eaten.

My favorite dessert that Kate makes is… the peach robotayaki at Vedge, right now. It has a honeydew duck sauce and yuzu cornbread. It’s just one of the most pure expressions of her genius with desserts. She does a lot of great gooey stuff and cheesecake stuff and decadent stuff, but this is so pure and clean and vivid, it’s just remarkable.

If you’re coming to our house for dinner, please bring a bottle of… a really good natural wine that Kate would approve of. She says anything from Arianna Occhipinti.

Doing business in the City of Philadelphia…. can be frustrating. The city was never prepared for the influx of restaurants in the last five to ten years, but it is what it is, and there’s more business to be done in the city than any suburb. It’s just the cost of doing business. The key to happiness in life is acceptance. You deal with it and move on.

* Ed Note: McDonald’s used to fry their French fries in beef tallow, and if you’re wondering why McDonald’s French fries of 2017 are horrible compared to those of 1987, its because they stopped doing so, as documented by Malcolm Gladwell in this fascinating episode of his podcast. These days, it’s unclear exactly what is in a McDonald’s French fry, but we do know that the “natural beef flavoring” used in the recipe is milk-based and, therefore, non-vegan.

Follow @VictorFiorillo on Twitter

Let's block ads! (Why?)

http://www.phillymag.com/foobooz/2017/08/31/vegan-restaurants-in-philadelphia-rich-landau-vedge/
If you enjoy recipes like this, we highly recommend downloading the Food Monster App, it's available for both Android and iPhone and has free and paid versions. The app is loaded with thousands of allergy-friendly & vegan recipes/cooking tips, has hundreds of search filters and features like bookmarking, meal plans and more! The app shows you how having diet/health/food preferences can be full of delicious abundance rather than restrictions!

We know… patatas bravas is normally a fried potato dish. This is a spin on the heavy, fried, unhealthy classic version. This recipe is fresher and brighter yet just as satisfying! Go ahead, fry or bake the potatoes and toss the sauce through. Because seriously, who doesn’t love potato salad? And no eggs means you can take this to picnics and have a light, tangy, spicy alternative that won’t go toxic in the sun.

Ensalada con Patatas Bravas: Spanish Potato Salad [Vegan, Grain-Free]

Ingredients

For the Potato Salad:

  • 2 pounds and 3 ounces of Kipfler potatoes
  • 1 tablespoon salt
  • 1/2 red onion, thinly sliced into strips
  • 2 large tomatoes, seeds removed and sliced into thin strips
  • 11.5 ounces cooked or canned chickpeas, drained and rinsed
  • Small handful flat-leaf parsley, roughly chopped

For the Sauce:

  • 4 tablespoons avjar (red bell pepper relish)
  • 2 tablespoons sherry vinegar
  • 1/2 tomato, seeds removed
  • 1 large garlic clove
  • 1 teaspoon chili flakes
  • 1/4 teaspoon ground cumin
  • 1/2 teaspoon ground turmeric
  • 1/2 teaspoon oregano
  • 1 teaspoon smoked paprika
  • 1/2 cup extra virgin olive oil

Preparation

  1. Place the potatoes in a large saucepan and cover with cold water. Add the salt and bring to the boil. Reduce the heat to a simmer and cook until the potatoes can be just pierced through with a knife. Drain and transfer to a large bowl.
  2. To make the bravas dressing, blend all of the ingredients except the olive oil in a blender. With motor running, slowly add the oil. Season with salt and pepper, to taste.
  3. Add the remaining salad ingredients to the potatoes and pour over enough dressing to coat really well. The potatoes will soak up quite a lot of the dressing, so add a little more than you think it needs. Check and adjust the seasoning, if necessary.

Notes

Recipes excerpted with permission from Smith & Daughters: A Cookbook (that happens to be vegan) by Shannon Martinez and Mo Wyse, published by Hardie Grant Books March 2017, RRP $35.00 hardcover. Smith & Daughters is an award-winning vegan restaurant in Melbourne, Australia, twice voted Time Out People’s Choice Restaurant of the Year (2016 and 2014).

https://www.amazon.com/Smith-Daughters-Cookbook-Happens-Vegan/dp/1743792077/?tag=onegrepla-20

EXPLORE MORE RECIPES WITH THESE INGREDIENTS:

AUTHOR & RECIPE DETAILS


photo

Shannon Martinez and Mo Wyse are the dynamic duo behind Melbourne’s award-winning vegan restaurant Smith & Daughters, which has twice been voted Time Out People’s Choice Restaurant of the Year (2016 and 2014). Chef Shannon has cooked since she can remember due to the influence of her Spanish paternal family. With her outside the square innovative talents she has contributed to kitchens across Melbourne for nearly 20 years. She eats meat, but has perfected her vegetarian – and latterly vegan – repertoire in pubs over the years. She says this is what makes her food so good; she tries to replicate the tastes and textures of meat, rather than putting out bland, predictable, vegan food. Mo (who is vegan) is a Seattle and New York expat. She studied journalism and has a background in PR and TV production, but has dedicated her passion for creative, plant-based food to creating Smith & Daughters, where she is the logistical, front-of-house and marketing brains behind this gun team.


Disclosure: One Green Planet accepts advertising, sponsorship, affiliate links and other forms of compensation, which may or may not influence the advertising content, topics or articles written on this site. Click here for more information.

Let's block ads! (Why?)

http://www.onegreenplanet.org/vegan-recipe/ensalada-con-patatas-bravas/

[unable to retrieve full-text content]

  1. Jeremy Corbyn reveals … his Christmas cake recipe  POLITICO.eu
  2. Full coverage
http://www.politico.eu/article/jeremy-corbyn-reveals-his-christmas-cake-recipe/

If you enjoy recipes like this, we highly recommend downloading the Food Monster App, it's available for both Android and iPhone and has free and paid versions. The app is loaded with thousands of allergy-friendly & vegan recipes/cooking tips, has hundreds of search filters and features like bookmarking, meal plans and more! The app shows you how having diet/health/food preferences can be full of delicious abundance rather than restrictions!

Beets have many uses, but maybe you've never thought to put them in your brownies. Here's your chance. These red velvet beet brownies are decadently healthy treats that have both dense and light textures. They're not only insanely delicious but also have amazing nutritional benefits. They're also refined-sugar free!

Red Velvet Beet Brownies With Aquafaba Vanilla Cashew Cream Frosting [Vegan, Gluten-Free]

Serves

12

Cook Time

35

Ingredients

For the Red Velvet Brownies:

  • 3/4 cup pitted dates (soaked in 1/2 cup boiling water)
  • 2 medium beets (240g) – Peeled, diced and blitzed in food processor
  • 1 TBS Chia Seeds – left to swell in 3 TBS boiling water
  • 1 1/2 Cup Almond Meal – ground almonds
  • 1/3 Cup Coconut Flour
  • 1 Tsp Baking Powder
  • 1 TBS Psyllium Husk
  • 1/3 Cup Coconut Sugar
  • 2 TBS Organic Cold Pressed Coconut Oil – melted
  • pinch of salt

For the Vanilla Cashew Cream Frosting:

  • 1 cup cashews (soaked in water over night, rinsed and drained)
  • 1 teaspoon vanilla extract
  • 1 teaspoon lemon juice, freshly squeezed
  • 1 tablespoon rice malt syrup/maple syrup
  • 1/4 cup organic cold-pressed coconut oil, melted
  • 1/4 cup coconut milk
  • Pinch of salt

For the Aquafaba:

  • 1/2 of the liquid from a can of chickpeas (1/3 cup)
  • 1 tablespoon rice malt syrup/maple syrup
  • 1 teaspoon vanilla extract

Preparation

To Make the Red Velvet Brownies

  1. Add the chia seeds and water to a small bowl and leave aside to swell.
  2. Pre-heat the oven to 390°F.
  3. Add the dates and boiling water to a small sauce pot on the stove. Bring to the boil and reduce to simmer. Eventually, the dates will soften down and a paste will form. Continue to stir until paste has formed.
  4. Add the melted 2 tablespoons of coconut oil to the sauce pot and stir until all combined.
  5. Peel, dice, and blitz the beet in a food processor. Add to a large mixing bowl with the remaining dry ingredients. Mix thoroughly until all combined.
  6. Add the date paste along with the soaked chia seeds to the large mixing bowl, and mix all the ingredients well.
  7. Line a deep baking dish with baking paper. Transfer the brownie mixture to the dish and press down firmly with a silicone spatula, back of a tablespoon, or your hands (careful because beet stains).
  8. Poke a few spots around the dish with a fork to ensure even cooking.
  9. Place into the oven and bake for 17-20 minutes until cooked through.
  10. Once cooked through, remove from oven, and allow to cool before slicing into squares. Be careful as it’s a delicate consistency.

To Make the Vanilla Cashew Cream Frosting:

  1. Add all ingredients into a nutribullet or blender and blend until smooth. You can add less coconut milk if you’re wanting a thicker frosting.

To Make the Aquafaba:

  1. Place the aquafaba chickpea liquid into a medium mixing bowl. Using an electric beater, beat the liquid until thick fluffy white ‘clouds’ form. Similar to that of egg whites.
  2. When white and fluffy, add 1 tablespoon rice malt syrup/maple syrup and 1 teaspoon vanilla extract and beat for a couple more seconds to mix through.

To Make the Aquafaba Vanilla Cashew Cream Frosting:

  1. Gently fold through the aquafaba (approx. 1/2 cup) into the cashew cream frosting until fully combined, light and fluffy.
  2. Ideally, you’ll want to transfer into a plastic/piping bag, remove all air, and place into the fridge/freezer for a few minutes to cool and slightly harden.
  3. When you’re ready, you can pipe the frosting over the brownies however which way you please.
  4. This aquafaba can be made to further lighten the frosting, however not 100% necessary and can be left out.

AUTHOR & RECIPE DETAILS


photo

Refined sugar-free desserts and creative, flavorful whole foods plant-based dinners. Taryn is a health and wellness enthusiast who has a passion for creating, capturing and sharing delicious plant-based recipes. She is a self-taught blogger, food stylist and photographer, and a qualified Wellness Facilitator. Her path to wellness embarked with a nearly fatal diagnosis of Type 1 Diabetes. She changed her lifestyle, adopted a sugar-free, plant-based diet, detoxified her body and mind and continues to thrive, inspiring others through her blog Wellness with Taryn.


Disclosure: One Green Planet accepts advertising, sponsorship, affiliate links and other forms of compensation, which may or may not influence the advertising content, topics or articles written on this site. Click here for more information.

Let's block ads! (Why?)

http://www.onegreenplanet.org/vegan-recipe/red-velvet-beet-brownies/

[unable to retrieve full-text content]

  1. Harry Potter Cauldron Cake Recipe  HungryForever.com (blog)
  2. Full coverage
https://www.hungryforever.com/recipe/harry-potter-cauldron-cake-recipe/

If you enjoy recipes like this, we highly recommend downloading the Food Monster App, it's available for both Android and iPhone and has free and paid versions. The app is loaded with thousands of allergy-friendly & vegan recipes/cooking tips, has hundreds of search filters and features like bookmarking, meal plans and more! The app shows you how having diet/health/food preferences can be full of delicious abundance rather than restrictions!

Swirls of bright pinks, creamy vanilla, and earthy chocolate– we have to admit, this Neapolitan ice cream is almost too pretty to eat! The surprising bursts of fruitiness from the strawberry paired with the chocolate and banana-vanilla give the perfect balance of sweetness and tartness. Satisfy your inner child by eating all the ice cream you want for breakfast, lunch, or dinner and not feel guilty at all!

4-Ingredient Neapolitan 'Nice' Cream [Vegan, Gluten-Free]

Ingredients

For the Vanilla:

  • 2 ripe bananas
  • 2 tablespoons unsweetened vanilla almond milk

For the Strawberry:

  • 2 ripe bananas
  • 1 1/4 cup strawberries, quartered
  • 2 tablespoons unsweetened vanilla almond milk

For the Chocolate:

  • 2 ripe bananas
  • 1/4 cup cocoa powder
  • 2 tablespoons unsweetened vanilla almond milk

Preparation

  1. Night before assembling the ice cream, slice your bananas into thin rounds and your strawberries into quarters. Lay out in a single layer on a baking tray. Cover with cling wrap and freeze.
  2. For the vanilla flavor, add 2 of the frozen bananas and 2 tablespoons of vanilla almond milk into the blender/food processor and blend until smooth. Taste and add agave/maple syrup if needed. Scoop out into a bowl. Cover and freeze until needed.
  3. For the strawberry flavor, add 2 of the frozen bananas, frozen strawberries, and almond milk into the blender. Blend until smooth, scraping down if you need to. Taste and adjust sweetness. Scoop out into another bowl and freeze until needed.
  4. For the chocolate flavor, add remaining 2 frozen bananas, cocoa powder, and almond milk. Blend until smooth.
  5. In a 9×5-inch loaf pan, alternate large scoops of chocolate, strawberry and vanilla “nice” cream.
  6. Smooth out the top. Serve immediately or cover and freeze for later. Take out “nice” cream 10-15 minutes before serving to thaw.

EXPLORE MORE RECIPES WITH THESE INGREDIENTS:

AUTHOR & RECIPE DETAILS


photo

Paleo-friendly international recipes free from refined sugar and oil. 2 sisters. Identical Twins. Born and raised in the beautiful metropolitan city of Hong Kong. Passionate and eager travelers around the world. City girls. Both studying in the states. Both aspiring naturopathic doctors. Creators of the blog Sprinkle of Vanilla Sugar. After being sick for a long time we decided to change our diet. We create recipes that are gluten-free, dairy-free, vegan, paleo, oil-free and refined sugar-free.


Disclosure: One Green Planet accepts advertising, sponsorship, affiliate links and other forms of compensation, which may or may not influence the advertising content, topics or articles written on this site. Click here for more information.

Let's block ads! (Why?)

http://www.onegreenplanet.org/vegan-recipe/four-ingredient-neapolitan-nice-cream/

The traditional version of this cake doesn't use almond meal, but I find the meal gives it a deliciously moist texture. A small glass of port is the perfect accompaniment.

Ingredients

 2 cups plain flour

1 cup almond meal

2 tsp baking powder

½ tsp salt

4 eggs

1¼ cup honey

1 cup olive oil

rind and juice of 2-3 oranges (1 cup juice)

icing sugar, to dust

Method

1. Heat your oven to 160°C. Whisk the flour, almond meal, baking powder and salt together in a large bowl.

2. In a separate bowl, whisk the eggs and honey together until well combined and lightly aerated, then whisk in the olive oil, orange juice and rind.

3. Fold the dry mixture into the wet mixture until just combined, then transfer this to a greased and lined 22cm round cake tin.

4. Bake for 1 hour or until cooked through (a skewer inserted into the cake should come out dry). Remove from the oven and allow to cool completely. Dust with icing sugar to serve.

If you like this recipe, try Adam Liaw's Portuguese mussel, prawn and chorizo cataplana

Let's block ads! (Why?)

http://www.goodfood.com.au/recipes/portuguese-orange-olive-and-honey-cake-recipe-20170827-gy5cjd

According to self-nutrition, 100 grams of canned sauerkraut contain vitamins A, C, E, K and very important minerals such as: calcium, Iron, Magnesium, phosphorus and many other very important nutrients.

Korean Kimchi, just like sauerkraut, involves fermenting cabbage. So, kimchi is an asian version of sauerkraut enriched with extra flavors and a kick of spices, making this dish, a delicious alternative to sauerkraut. So, you are going to enjoy the DIY Korean Kimchi vegan recipe below.

Ingredients

1 medium head (2 pounds) napa cabbage
1/4 cup sea salt or kosher salt (see Recipe Notes)
Water (see Recipe Notes)
1 tablespoon grated garlic (5 to 6 cloves)
1 teaspoon grated ginger
1 teaspoon sugar
2 to 3 tablespoons seafood flavor or water (optional, see Recipe Notes)
1 to 5 tablespoons Korean red pepper flakes (gochugaru)
8 ounces Korean radish or daikon, peeled and cut into matchsticks
4 scallions, trimmed and cut into 1-inch pieces

equipment

Cutting board and knife
Large bowl
Gloves (optional but highly recommended)
Plate and something to weigh the kimchi down, like a jar or can of beans
Colander
Small bowl
Clean 1-quart jar with canning lid or plastic lid
Bowl or plate to place under jar during fermentation

Method

Slice the cabbage: Cut the cabbage lengthwise into quarters and remove the cores. Cut each quarter crosswise into 2-inch-wide strips.

Salt the cabbage: Place the cabbage and salt in a large bowl. Using your hands (gloves optional), massage the salt into the cabbage until it starts to soften a bit, then add water to cover the cabbage. Put a plate on top and weigh it down with something heavy, like a jar or can of beans. Let stand for 1 to 2 hours.

Rinse and drain the cabbage: Rinse the cabbage under cold water 3 times and drain in a colander for 15 to 20 minutes. Rinse and dry the bowl you used for salting, and set it aside.

Make the paste: Meanwhile, combine the garlic, ginger, sugar, and seafood flavor (or 3 tablespoons water) in a small bowl and mix to form a smooth paste. Mix in the gochugaru, using 1 tablespoon for mild and up to 5 tablespoons for spicy (I like about 3 1/2 tablespoons).

Combine the vegetables and paste: Gently squeeze any remaining water from the cabbage and return it to the bowl along with the radish, scallions, and seasoning paste.

Advertisement

Mix thoroughly: Using your hands, gently work the paste into the vegetables until they are thoroughly coated. The gloves are optional here but highly recommended to protect your hands from stings, stains, and smells!

Pack the kimchi into the jar: Pack the kimchi into the jar, pressing down on it until the brine rises to cover the vegetables. Leave at least 1 inch of headspace. Seal the jar with the lid.

Let it ferment: Let the jar stand at room temperature for 1 to 5 days. You may see bubbles inside the jar and brine may seep out of the lid; place a bowl or plate under the jar to help catch any overflow.

Check it daily and refrigerate when ready: Check the kimchi once a day, pressing down on the vegetables with a clean finger or spoon to keep them submerged under the brine. (This also releases gases produced during fermentation.)

Taste a little at this point, too! When the kimchi tastes ripe enough for your liking, transfer the jar to the refrigerator. You may eat it right away, but it's best after another week or two

Tips

Use salt that is free of iodine and anti-caking agents, which can inhibit fermentation.
Chlorinated water can inhibit fermentation, so use spring, distilled, or filtered water if you can.

For more recipes like the above, go to: thekitchn

It is important that Korean Kimchi is not only a delicious alternative to sauerkraut, because fermented cabbage is a natural probiotic, which may be one of the ideal foods to consume during viral infections, and also an inexpensive food option for patients with liver cirrhosis.

For more vegan related stories, click on the links below

Here is why vegan foods to treat asthma can improve overall health

Reap the health benefits of edible flowers with these 5 vegan recipes

5 vegan antioxidant smoothies using hemp milk

5 vegan recipes with eggplant to reap its many health benefits

Let's block ads! (Why?)

https://www.emaxhealth.com/13644/korean-kimchi-vegan-recipe-delicious-alternative-sauerkraut

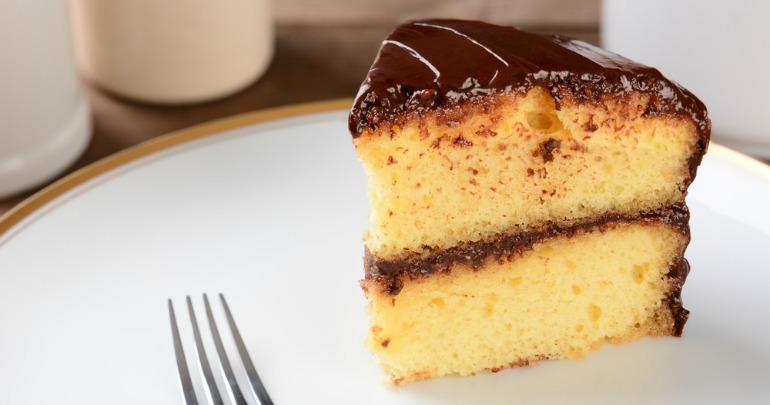
Yellow cake is a classic that has stood the test of time in kitchens across the country for a reason. Its light, mildly vanilla flavour goes perfectly with coffee and tea and is an easy crowd pleasure for guests. Most bakers serve it with chocolate frosting layered in the middle and over the outside to create a delicious and show-stopping finish. While there are a number of variations to the recipe out there, this one creates a light and airy cake that still retains its elusive moistness every time. The trick is the egg whites, which a whipped separately and then folded gently through the batter.

Ingredients

  • 8 ounces (2 sticks) unsalted butter, softened, plus more for pans
  • 3 cups cake flour, plus more for dusting
  • 2 teaspoons baking powder
  • 1/2 teaspoon baking soda
  • 1/2 teaspoon kosher salt
  • 2 cups sugar
  • 4 large eggs, separated (egg whites whipped to stiff peaks)
  • 1 teaspoon pure vanilla extract
  • 1 cup buttermilk, room temperature

Method

1. Preheat oven to 350F. Butter and line two 9-inch round cake pans with parchment. Butter parchment, then flour pans, tapping out excess. Set aside.

Ad. Article continues below.

2. Whisk together flour, baking powder, baking soda, and salt in a medium bowl, then set aside.

3. Put butter and sugar in the bowl of an electric mixer fitted with the paddle attachment; cream on medium-high speed until pale, 2 to 3 minutes. On medium speed, add eggs yolks one at a time, mixing well after each addition. Add vanilla and mix, scraping down sides of bowl as you go.

4. On low speed, add flour mixture in three batches, alternating with two batches of buttermilk. Fold in egg whites. Stir gently with a rubber spatula until the batter is evenly blended.

3. Divide batter between pans. Smooth the top of each layer with a spatula. Bake until a cake tester inserted into centers comes out clean, 30-35 minutes.

4. Remove cakes from oven and let cool in pans on wire racks for 20 minutes. Run a knife around edges of cakes to loosen. Invert cakes from pans. Peel off parchment from cakes. Carefully turn cakes the right way up and let cool completely on racks.

Let's block ads! (Why?)

https://startsat60.com/food-drink/recipes/sweet-stuff/the-only-yellow-cake-recipe-you-need

If you enjoy recipes like this, we highly recommend downloading the Food Monster App, it's available for both Android and iPhone and has free and paid versions. The app is loaded with thousands of allergy-friendly & vegan recipes/cooking tips, has hundreds of search filters and features like bookmarking, meal plans and more! The app shows you how having diet/health/food preferences can be full of delicious abundance rather than restrictions!

Simply put, this is a Chilean dish very similar to shepherd’s pie. Typically, this dish has big juicy chunks of beef, but we find eggplant is the best substitute as it doesn’t have much flavor of its own and carries all the flavors of the dish while still retaining its shape. This is fantastic served with a green salad dressed with our lemon and cumin vinaigrette.

Pastel de Choclo: Chilean Shepherd's Pie [Vegan, Gluten-Free]

Ingredients

For the Pastel de Choclo:

  • Olive oil
  • 1 large eggplant, cut into 3/4-inch cubes
  • 9 ounces Button mushrooms, quartered
  • 1 onion, finely chopped
  • 3 garlic cloves, crushed
  • 1 jalapeño, finely diced (seeds removed for a milder version)
  • 1 red bell pepper, finely chopped
  • 1 tablespoon tomato paste (concentrated purée)
  • 1 teaspoon cumin seeds
  • 1 teaspoon dried oregano
  • 4.5 ounces canned or fresh tomatoes, diced
  • 1 tablespoon red wine vinegar
  • 7 ounces firm tofu, diced or crumbled
  • 4.5 ounces black olives, halved
  • 1 tablespoon sweet paprika
  • 1 tablespoon soy sauce or tamari
  • 2 1/2 cups soy milk
  • 9 ounces vegan butter
  • 13 ounces creamed corn
  • 1 tablespoon nutritional yeast
  • 8 ounces frozen corn kernels
  • 5.5 ounces fine polenta (cornmeal)
  • Sea salt flakes

For the Lemon and Cumin Vinaigrette:

  • 1/4 cup lemon juice
  • 1 teaspoon cumin seeds
  • 1 tablespoon agave syrup
  • 1/2 tablespoon Dijon mustard
  • 1/2 teaspoon salt
  • 1/2 teaspoon pepper
  • 1/3 cup extra virgin olive oil

Preparation

To Make the Pastel de Choclo:

  1. Coat the bottom of a large ovenproof frying pan with a thin layer of olive oil and place over medium heat. Add the eggplant and cook for 3–4 minutes until soft and slightly golden.
  2. Transfer the eggplant to a bowl and add another swig of oil to the pan. Add the mushrooms, season with salt and pepper and cook for 3–4 minutes until golden. Add the mushroom to the bowl with the eggplant.
  3. Add another swig of oil to the pan and cook the onion, garlic, jalapeño, and bell pepper with a large pinch of salt. Cook for 3–4 minutes until soft. Add the tomato paste, cumin seeds, and oregano and cook for a further 1 minute over low heat.
  4. Return the eggplant and mushroom to the pan and add the tomato, red wine vinegar, tofu, olives, paprika, soy sauce, and 1/4 cup water. Season with salt and pepper and cook over low heat for 15 minutes to allow the flavors to develop. Remove from the heat and throw it all back into the bowl.
  5. Rinse out the pan because you’re going to be building the dish in there.
  6. Heat the soy milk and butter in a medium-sized saucepan until it comes to a slow simmer. Add the creamed corn, nutritional yeast (if using), and frozen corn. Stir to combine. Pour in the polenta in a steady stream and whisk until it’s all incorporated. The mixture will become very thick so you’ll need to swap your whisk for a wooden spoon. Reduce the heat to as low as possible and cook, stirring constantly for about 5 minutes. Season with salt and pepper to taste. If you have a bit of vegan cheese lying around, chuck it in at this stage and stir until melted through.
  7. Preheat the oven to 340°F. Rub the base and side of the frying pan you’ve been using with a little olive oil.
  8. Scoop about 1/3 of the corn mixture into the bottom of the pan and spread out to cover the entire base of the pan. It will be a bit sticky so it’s going to be easier if you wet your hands first and then press it down using flat fingers. You can also use a flat spoon.
  9. Pour over the filling and spread out so that the base is completely covered and the top is flat. Now, finish off with the rest of the corn mix and spread out evenly so there is no filling to be seen.
  10. Bake in the oven for 30–40 minutes until the top is starting to turn golden and crunchy-looking. Don’t let it get too dark though or it will dry out.
  11. Remove from the oven and set aside for about 5 minutes, to allow the crust to firm up a little. Sprinkle over some sea salt flakes before serving.

To Make the Lemon and Cumin Vinaigrette:

  1. Place the lemon juice, cumin seeds, agave syrup, mustard, salt, and pepper in a blender or jug.
  2. With the motor set to low or whisking by hand, slowly drizzle in the oil until well combined and emulsified.

Notes

Recipes excerpted with permission from Smith & Daughters: A Cookbook (that happens to be vegan) by Shannon Martinez and Mo Wyse, published by Hardie Grant Books March 2017, RRP $35.00 hardcover. Smith & Daughters is an award-winning vegan restaurant in Melbourne, Australia, twice voted Time Out People’s Choice Restaurant of the Year (2016 and 2014).

https://www.amazon.com/Smith-Daughters-Cookbook-Happens-Vegan/dp/1743792077/?tag=onegrepla-20

EXPLORE MORE RECIPES WITH THESE INGREDIENTS:

AUTHOR & RECIPE DETAILS


photo

Shannon Martinez and Mo Wyse are the dynamic duo behind Melbourne’s award-winning vegan restaurant Smith & Daughters, which has twice been voted Time Out People’s Choice Restaurant of the Year (2016 and 2014). Chef Shannon has cooked since she can remember due to the influence of her Spanish paternal family. With her outside the square innovative talents she has contributed to kitchens across Melbourne for nearly 20 years. She eats meat, but has perfected her vegetarian – and latterly vegan – repertoire in pubs over the years. She says this is what makes her food so good; she tries to replicate the tastes and textures of meat, rather than putting out bland, predictable, vegan food. Mo (who is vegan) is a Seattle and New York expat. She studied journalism and has a background in PR and TV production, but has dedicated her passion for creative, plant-based food to creating Smith & Daughters, where she is the logistical, front-of-house and marketing brains behind this gun team.


Disclosure: One Green Planet accepts advertising, sponsorship, affiliate links and other forms of compensation, which may or may not influence the advertising content, topics or articles written on this site. Click here for more information.

Let's block ads! (Why?)

http://www.onegreenplanet.org/vegan-recipe/pastel-de-choclo/

If you enjoy recipes like this, we highly recommend downloading the Food Monster App, it's available for both Android and iPhone and has free and paid versions. The app is loaded with thousands of allergy-friendly & vegan recipes/cooking tips, has hundreds of search filters and features like bookmarking, meal plans and more! The app shows you how having diet/health/food preferences can be full of delicious abundance rather than restrictions!

Crumbly topping, tangy spread. Opportunities abound with this baked almond feta. The richness of almonds and refreshing taste of lemon add a nice finish to pastas, and salads, a flavourful base for sandwiches, or a topper for crackers and baguette slices. When this baked almond based feta is around you’ll find yourself adding it to everything. It has a way of making good things great. To top it all off, it's easy to make!

Baked Almond Feta [Vegan, Grain-Free]

Serves

1 9-ounce wheel of cheese

Cook Time

45

Ingredients

  • 1 1/2 cups almond flour
  • 2 medium garlic cloves, roughly chopped
  • 5 tablespoons water
  • 3 tablespoons lemon juice
  • 3 tablespoons olive oil
  • 1/2 teaspoon salt
  • 1-3 tablespoons dried or fresh herbs of choice, chopped if fresh
  • 1 teaspoon olive oil

Preparation

  1. Place in food processor and process on high speed for about 5 minutes, until the mixture becomes a smooth paste.
  2. If used, add herbs to the food processor and pulse a few more times.
  3. Place a 2-foot long piece of plastic wrap on a flat surface and lightly grease it with olive oil.
  4. Transfer the paste from the food processor bowl into the middle of the laid out plastic wrap.
  5. Take the four corners of the plastic wrap and bring them together, above the paste. All four corners should be touching each other.
  6. Now tighten the wrap around the paste so that it forms a ball completely covered with plastic (and none of the paste can escape). Shape the paste with your hands to form a round disk and set it down. Now cover a baking sheet with parchment paper.
  7. Gently unwrap the plastic around the paste and transfer it on to the parchment paper. Place the baking sheet on to the middle oven rack and bake for about 20 minutes, until the wheel is slightly cracked and starts turning golden on the edges. Cool before serving.

Nutrional Information

Total Calories: 1368 | Total Carbs: 39 g | Total Fat: 130 g | Total Protein: 36 g | Total Sodium: 1061 g | Total Sugar: 7 g

Calculation not including herbs.

Notes

Store it in the fridge, wrapped in plastic wrap, for up to two weeks.

EXPLORE MORE RECIPES WITH THESE INGREDIENTS:

AUTHOR & RECIPE DETAILS


photo

Iva is a nature and animal lover, which led her to consider her impact on the environment and fellow creatures. Subsequently, she switched her diet to consist entirely of plant-based ingredients. Realizing that vegan cuisine can be versatile and delicious, she decided to share her recipes through her blog, PlantifulYum. There you will find a growing list of tried and tested recipes with one objective: turn plant-based ingredients into food that makes you say “Yum.”


Disclosure: One Green Planet accepts advertising, sponsorship, affiliate links and other forms of compensation, which may or may not influence the advertising content, topics or articles written on this site. Click here for more information.

Let's block ads! (Why?)

http://www.onegreenplanet.org/vegan-recipe/baked-almond-feta/

Heat oven to 350 degrees F.

In a large bowl of a food processor fitted with blade attachment, combine flour, brown sugar and 2 teaspoons cinnamon. Pulse until well combined.

Add butter slowly, pulsing between additions, until pea-sized pieces form.

Press 1/2 of the mixture in an ungreased 9-inch springform pan; set remaining mixture aside.

Place apples, stevia, cornstarch, and remaining 1 teaspoon cinnamon in a large bowl; stir to combine. Place apples in prepared springform pan. Evenly sprinkle the remaining mixture over apples.

Place springform pan on baking sheet with sides. Bake 60–70 minutes until top is golden.

Remove from oven. Run knife around the edge of pan; let cake cool completely. Remove springform ring just before serving.

Let's block ads! (Why?)

https://www.thedailymeal.com/recipes/apple-pie-streusel-cake-recipe

If you enjoy recipes like this, we highly recommend downloading the Food Monster App, it's available for both Android and iPhone and has free and paid versions. The app is loaded with thousands of allergy-friendly & vegan recipes/cooking tips, has hundreds of search filters and features like bookmarking, meal plans and more! The app shows you how having diet/health/food preferences can be full of delicious abundance rather than restrictions!

These are a hit, every time. Best thing about cauliflower wings, is that you can coat them in whatever sauce you want, so they can be different all the time. Fun, right? You can use a sweet thai chili sauce, BBQ sauce, some vegan butter, whatever floats your boat! If you don’t have time to make your own sauce, just use a ready-made one. Whatever you do, just be sure you make these bad boys.

Battered Cauliflower Wings [Vegan]

Calories

252

Serves

2

Cook Time

60

Ingredients

  • 1 head cauliflower
  • 1 cup non-dairy milk
  • 3/4 cup flour
  • 1/2 teaspoon garlic powder
  • 1/2 teaspoon white pepper
  • 1/4 teaspoon paprika
  • 1/4 teaspoon salt

Preparation

  1. Preheat oven to 450°F.
  2. Wash and cut cauliflower into bite-size florets.
  3. Mix flour and spices together.
  4. Add milk and whisk until smooth.
  5. Prepare a baking sheet with parchment paper.
  6. Coat florets individually and place on baking sheet. Allow excess batter to drip away first.
  7. Bake 25 minutes, until golden brown.
  8. Toss in your favorite sauce or eat as-is with a dipping sauce.
  9. If coating in sauce, bake another 5 minutes to crisp up, or enjoy freshly coated.

Nutrional Information

Total Calories: 504 | Total Carbs: 100 g | Total Fat: 4 g | Total Protein: 21 g | Total Sodium: 873 g | Total Sugar: 14 g

Per Serving: Calories: 252 | Carbs: 50 g | Fat: 2 g | Protein: 11 g | Sodium: 437 mg | Sugar: 7 g

EXPLORE MORE RECIPES WITH THESE INGREDIENTS:

AUTHOR & RECIPE DETAILS


photo

Hi there! We're Victoria and Christopher, husband and wife from Montréal, Canada. Our passion is inspiring plant-based living in others, through the food we prepare and the places we travel. We created Eh Vegan to help people embrace a cruelty-free lifestyle and stick with it. We hope you enjoy our simple, delicious recipes as much as we do. Come say hi on Instagram or Facebook. That’s where we hang out the most!


Disclosure: One Green Planet accepts advertising, sponsorship, affiliate links and other forms of compensation, which may or may not influence the advertising content, topics or articles written on this site. Click here for more information.

Let's block ads! (Why?)

http://www.onegreenplanet.org/vegan-recipe/battered-cauliflower-wings/

[unable to retrieve full-text content]

  1. Rachel Roddy's ricotta, lemon and olive oil ring cake recipe  The Guardian
  2. Full coverage
https://www.theguardian.com/lifeandstyle/2017/aug/22/ricotta-lemon-olive-oil-ring-cake-recipe-ciambellone-rachel-roddy

[unable to retrieve full-text content]

  1. Sleeping Beauty Buttercream Cake Recipe  HungryForever.com (blog)
  2. Full coverage
https://www.hungryforever.com/recipe/sleeping-beauty-buttercream-cake-recipe/

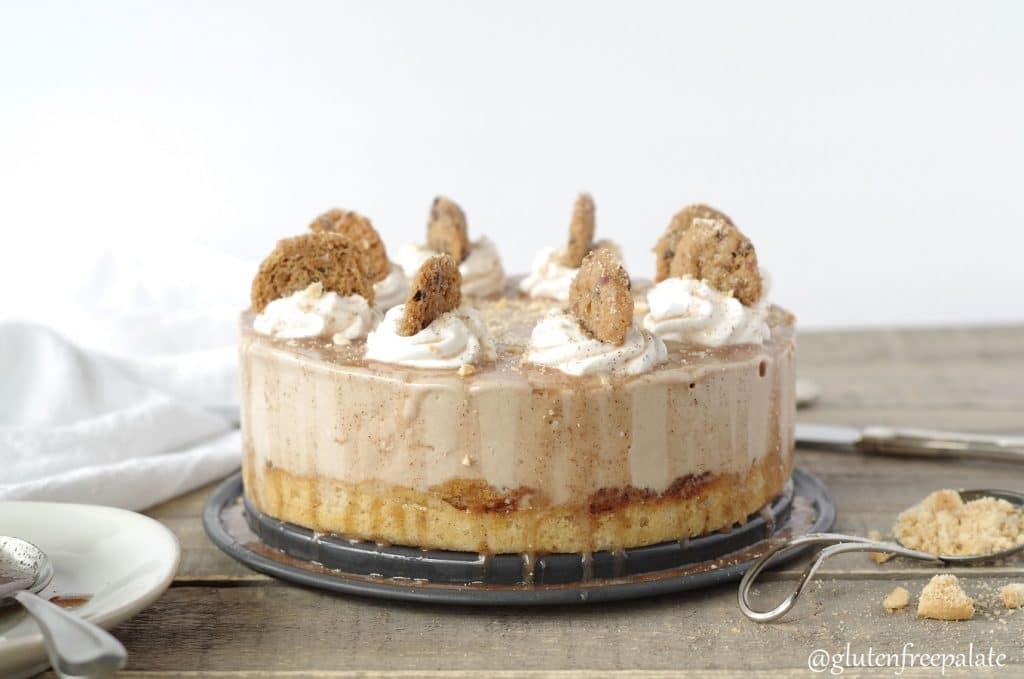
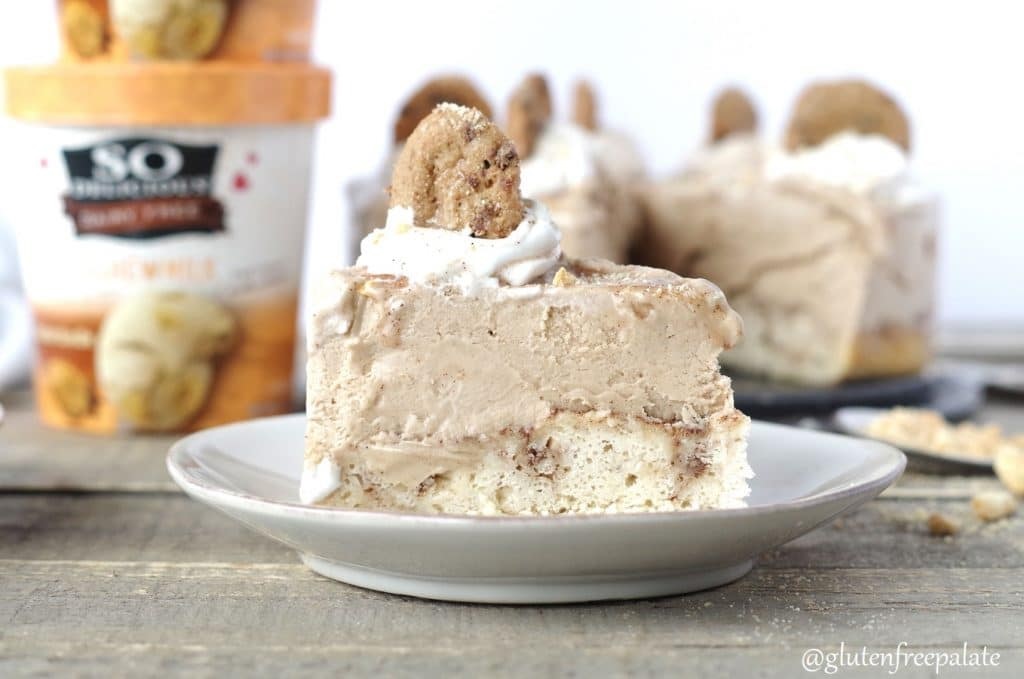
This show-stopping Cinnamon Roll Ice Cream Cake recipe was the Grand Prize Winner in the Cashew category of our #FrozenFridays Recipe Contest. The event was sponsored by So Delicious Dairy Free and sponsored by us, Go Dairy Free. But this winning submission was created by Chrystal Carver.

Cinnamon Roll Ice Cream Cake Recipe - A Vegan, Gluten-Free, Grand-Prize Dairy-Free Recipe Contest Winner. Tested and Loved!

Chrystal is the recipe developer and writer behind Gluten-Free Palate. She comes from a family with a history of cooking and baking, and has been an avid baker since she was little. She believes that baking gluten-free and dairy-free shouldn’t require extravagant ingredients or complicated steps. You can connect with Chrystal on Facebook, Twitter, and Instagram.

You can also enjoy Chrystal’s cookbook, Sweet & Simple Gluten-Free Baking: Irresistible Classics in 10 Ingredients or Less! It isn’t a dairy-free cookbook, but the recipes are very easy to adapt with dairy-free ingredients, like milk beverage and buttery spread or sticks.

Cinnamon Roll Ice Cream Cake Recipe - A Vegan, Gluten-Free, Grand-Prize Dairy-Free Recipe Contest Winner. Tested and Loved!

Our Testing Notes: Cinnamon Roll Ice Cream Cake

We all agreed that this recipe had winning potential for its creativity and well-written recipe structure. But it was the preparation and tasting that led to the Grand Prize Award. Our tester said:

This cake!! It’s so good! The cake really does taste like a cinnamon roll and has a lovely moist cakey texture. The cinnamon mixture that gets swirled into the top of the cake got a little crispy when baked, which was really delicious and a nice bit of texture. I expected it to be over the top sweet, especially with the glaze, but the cake itself actually wasn’t too sweet so it was a nice balance.

Cinnamon Roll Ice Cream Cake Recipe - A Vegan, Gluten-Free, Grand-Prize Dairy-Free Recipe Contest Winner. Tested and Loved!

Special Diet Notes: Cinnamon Roll Ice Cream Cake

By ingredients, this recipe is dairy-free / non-dairy, egg-free, gluten-free, peanut-free, soy-free, vegan, and vegetarian.

Cinnamon Roll Ice Cream Cake

Prep time

Cook time

Total time

  1. To make the cake, preheat your oven to 350°F (180°C) and grease an 8-inch round cake pan.
  2. In a large mixing bowl, whisk together the flour, sugar, baking powder, and salt.
  3. Add the milk beverage, flax egg, ¼ cup melted buttery spread, and vanilla and stir until combined.
  4. Pour batter into your prepared baking pan.
  5. In a small mixing bowl, whisk together the remaining ¼ cup melted buttery spread, brown sugar, and cinnamon.
  6. Spoon the cinnamon mixture over the cake. Use a butter knife to swirl it into the cake batter.
  7. Bake for 26 to 28 minutes or until a toothpick inserted into the center of the cake comes out clean.
  8. Let the cake cool for 10 minutes in the pan, before carefully removing it to a wire rack to cool completely.
  9. Remove the frozen dessert from the freezer to let it soften.
  10. To make the ice cream cake, place the completely cooled cake in a 7-inch round springform pan (the cake shrinks a little as it cools) to help keep the ice cream from melting down the sides.
  11. Spoon the frozen dessert onto the cake and spread until it is even and compact.
  12. Freeze for 2 hours, or until ready to serve.
  13. Remove the ice cream cake from the freezer 10 to 15 minutes before serving.
  14. In a small mixing bowl, whisk together the powdered sugar, milk beverage, and cinnamon until smooth.
  15. Drizzle the cinnamon icing over top of the cake.
  16. If desired, top with CocoWhip and gluten-free vegan snickerdoodles.
  17. Store leftovers covered in the freezer for up to one month.

3.5.3226

Cinnamon Roll Ice Cream Cake Recipe - A Vegan, Gluten-Free, Grand-Prize Dairy-Free Recipe Contest Winner. Tested and Loved!

Let's block ads! (Why?)

https://www.godairyfree.org/recipes/cinnamon-roll-ice-cream-cake

Men’s Fitness.com has released a recipe from former WWE Superstar Austin Aries for vegan macaroni and cheese.

WWE.com now has an article up on the brawl between Seth Rollins and Dean Ambrose against Sheamus and Cesaro this week. It took place during the WWE 2K18 Summerslam Kickoff event. You can read more details of the incident and see some footage of it RIGHT HERE.

WWE.com has also released a video of Braun Strowman and Sasha Banks ringing the closing bell at the New York Stock exchange yesterday.

– Artist Rob Schamberger posted a mural at the WWE 2K18 event this week. You can check out a photo of the mural he painted, featuring Seth Rollins, below.

– NXT Superstar Nick Miller of TM-61 posted an old-school photo on his Twitter account. The show shows him in his NOAH days along with Hideo Itami (formerly KENTA). You can check out the photo Miller posted below.

Let's block ads! (Why?)

https://411mania.com/wrestling/various-news-video-sasha-banks-braun-strowoman-nyse-rob-schamberger-paints-mural-2k18-event-austin-aries-shares-vegan-recipe/

If you enjoy recipes like this, we highly recommend downloading the Food Monster App, it's available for both Android and iPhone and has free and paid versions. The app is loaded with thousands of allergy-friendly & vegan recipes/cooking tips, has hundreds of search filters and features like bookmarking, meal plans and more! The app shows you how having diet/health/food preferences can be full of delicious abundance rather than restrictions!

To be frank, these pistachio lemon tuiles are very simple to make but they are fiddley when it comes to shaping them. They have an extremely short window to shape them in before they cool down too much and snap if you dare roll them. Have everything ready to go before you take them out of the oven. As long as you prep properly, these are light yet decadent and beyond gorgeous to look at.

Pistachio Lemon Tuiles [Vegan]

Serves

25

Cook Time

70

Ingredients

For the Lemon Cream:

  • 1 1/2 cups cashews, soaked in water overnight or for at least 4 hours, drained
  • 1 1/2 lemons, zested
  • 1 lemon juiced
  • Pinch salt
  • 1/4 cup and 1 tablespoon maple syrup

For the Pistachio Tuiles:

  • 1/2 cup unsalted pistachios
  • 5 tablespoons whole wheat flour
  • 2 tablespoons arrowroot powder
  • 2 tablespoons vegetable oil
  • 1/4 cup rice malt syrup
  • 1/4 cup maple syrup

Preparation

To Make the Lemon Cream:

  1. Combine everything in a high-powered food processor or blender and blend until it’s smooth and creamy. Transfer to a bowl, cover and place in the refrigerator to chill while you make the tuiles.

To Make the Tuiles:

  1. Preheat the oven to 350°F fan forced. Place the pistachios on a lined baking tray and roast in the oven for 7 mins. Remove and leave to cool slightly.
  2. Transfer to a food processor and pulse to coarsely chop. There should be a mix of sizes ranging from powder to small chunks of nuts. Pour chopped pistachios into a medium bowl, add the flour and arrowroot powder. Mix to combine.
  3. In a seperate small mixing bowl combine the oil, rice malt syrup and maple syrup. Stir into the dry ingredients. Leave for 15 minutes to thicken.
  4. Meanwhile line two baking trays with grease proof paper. You’ll only be placing one tray at a time in the oven so when one comes out place the second one in. This is because the time in which you can shape the tuiles is very small so you have to work fast with small batches. Have 5 cannoli tubes or cone shaped tubes at the ready. (See notes if you don’t own these.)
  5. Drop teaspoon sized mixture onto the lined baking trays. Only five cookies to a sheet, one in each corner and one in the middle. They spread a lot. Bake 1 tray at a time for 10 minutes. They should be golden brown, thin and bubbly.
  6. Remove from oven and leave to cool on tray for 30 seconds. Working quickly (because they hardened very quickly) remove tuiles from the baking tray using a thspatulalar and shape around the moulds. Continue cooking and shaping until all the batter has been used.
  7. Once tuiles completely cool pipe the lemon cream into the centers. Squeeze a little extra lemon juice onto the cream, sprinkle with chopped pistachios and dust with icing sugar. Serve.

Notes

Helpful tip: If you don’t own a cannoli or cone shaped tube that’s alright! Cut 5 square pieces from grease proof paper, roll them into a cone, and staple them in place. Then stuff the insides with tissue so they won't crush when shaping the tuile around them. Easy hack!

EXPLORE MORE RECIPES WITH THESE INGREDIENTS:

AUTHOR & RECIPE DETAILS


photo

Simple, great-tasting desserts that are perfect for sharing. I am the recipe creator, photographer, blog writer and publisher for my site. I'm passionate about veganism, food, and health so I have chosen to bake using healthy ingredients because I believe that you should be able to eat everything guilt free! My aim is simple, to create great tasting vegan desserts that you can replicate and serve to your friends and family.


Disclosure: One Green Planet accepts advertising, sponsorship, affiliate links and other forms of compensation, which may or may not influence the advertising content, topics or articles written on this site. Click here for more information.

Let's block ads! (Why?)

http://www.onegreenplanet.org/vegan-recipe/pistachio-lemon-tuiles/